RedHat Enterprise Linux 8 VM on Hyper-V with Enhanced Session Mode
Activate Virtualization in BIOS
The first step to use Hyper-V on your computer is to activate Virtualization in the BIOS.
- On Intel platform, option name is
Intel VT-x - On AMD platform, option name is
AMD-V
For another platform or if you are facing any troubles, please refer to your computer documentation.
Activate Hyper-V on Windows 10
To be able to use Hyper-V on Windows 10, you first need to enable it. To do that, run the following command in Powershell as Administrator.
Enable-WindowsOptionalFeature -Online -FeatureName Microsoft-Hyper-V -All
/!\ By enabling Hyper-V you may have difficulties with another Hypervisor Software as VirtualBox or VMWare.
You can restart your computer to apply the new configuration.
Add user to Hyper-V Administrators group
Adding a user to Hyper-V Administrators group is easy and useful. You will be able to create / manage / delete / start / stop VMs without asking Administrators permission.
First, you need to know your Username in Windows. To do that, you can run Powershell as user. Then type the following command and your Username will be prompted.
echo $env:Username
Once you know your Username, you need to run Powershell but as Administrator and type de following command by replacing <USERNAME> with your Username. This will add the user to Hyper-V Administrators group.
net localgroup "Hyper-V Administrators" "<USERNAME>"
You can restart your computer to apply the new configuration.
Create VM
A dedicated guide provided by RedHat already exists. Just follow the instructions given by this guide.
Please pay attention to Before you begin section, point 1 if you want a no-cost Red Hat Developer subscription and the RHEL 8 Binary DVD .iso file.
RHEL8 images are available for download on RedHat Developers Website
RedHat guide : RHEL 8 Hyper-V Quick Install
You may install Centos 8 instead of rhel8. If is the case, you can follow the same guide and ignore subscription parts.
Centos 8 images are available for download on Centos Website
Hyper-V Enhanced Session Mode
Enhanced Session Mode allows:
- Better graphical experience (Fluidity and resolution).
- Clipboard support.
- Drives sharing.
- Smart card support.
- Audio support.
To enable Enhanced Session Mode, you need to install and configure hyperv-tools and xrdp on the VM.
To do that, you can run the dedicated script provided in the current repository. This script is only for Rhel 8 or Centos 8 OS.
git clone https://github.com/EtienneBarbier/Hyper-V-RHEL-8-VM.git
cd Hyper-V-RHEL-8-VM
chmod +x install_configure_esm_el8.sh
sudo ./install_configure_esm_el8.sh
Once this script has been executed, you can shut down the VM.
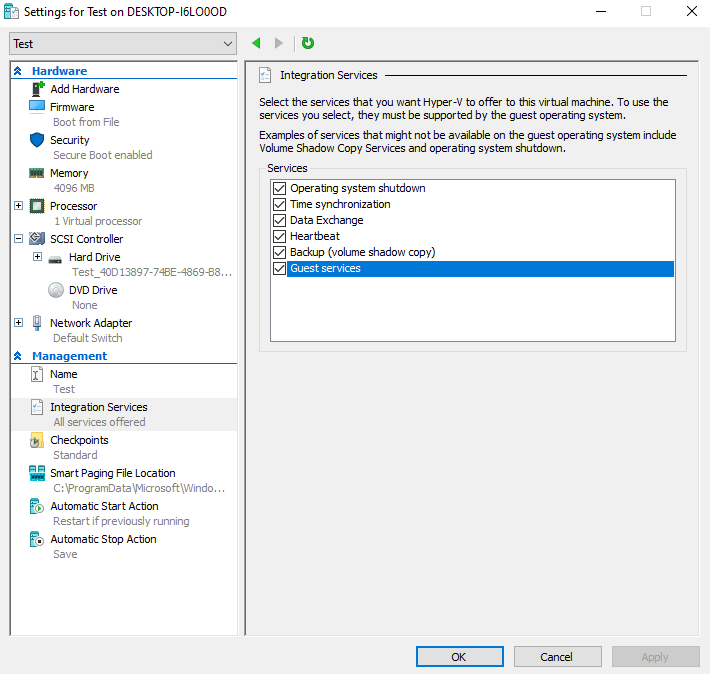
In Hyper-V you need to enable the Guest services for your VM. You can find the option under : Click right on VM > settings > Management > Integrations Services > Guest services.
The last step is to set the EnhancedSessionTransportType to HVSocket for your VM. This can be done by executing the following command line as user in Powershell by replacing <VM_NAME> by the name of your VM.
Set-VM "<VM_NAME>" -EnhancedSessionTransportType HVSocket
Now, you can start your VM. After a few moments, you should have the following windows prompted.
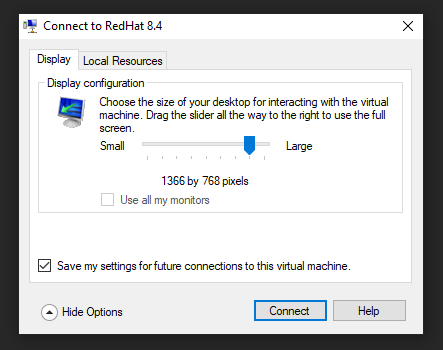
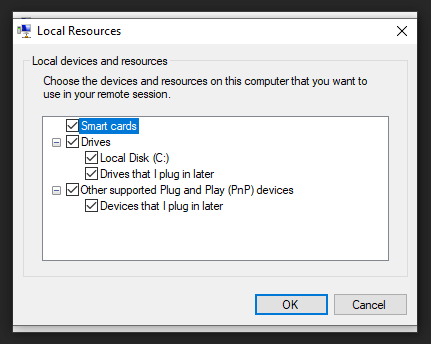
You can set your display settings and go to Local Resources to modify sound and clipboard settings.
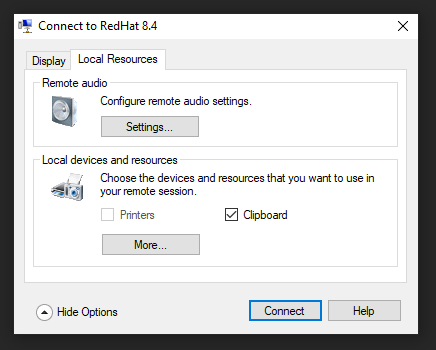
Under more, you have access to Drives and Smart Cards.
You are done with the settings and you can connect to your VM. Note that is not possible to connect with a user already connected in another session.
Sources
Linux VM Tools from Microsoft on Github
Enhanced Session Mode from Secana on Github
Audio
Audio is not working by default. To be able to have VM audio on the host computer, you need to install xrdp module for pulseaudio.
Prerequisites
Allow 2G of disk space for the mock root in /var/lib/mock.
It is assumed that you will be building and installing the package using an existing user account with sudo privileges.
Use these commands to install the mock package, and add the current user to the mock group:
sudo dnf install mock autoconf automake
sudo usermod -a -G mock $USER
Log out and log in again as the current user, and use the id -Gn command to check you are on the mock group
Prepare & build pulseaudio
mkdir xrdp-tmp
cd xrdp-tmp
dnf download --source pulseaudio sbc libatomic_ops webrtc-audio-processing
mock --chain ./sbc-*.src.rpm ./libatomic_ops-*.src.rpm ./webrtc-audio-processing-*.src.rpm ./pulseaudio-*.src.rpm
The last command can take a while to execute.
The build is made in a sub-directory of /var/lib/mock. This can be fairly deep, so is best located with a find command:
find /var/lib/mock -type d -name pulseaudio-\* 2>/dev/null
/var/lib/mock/epel-8-x86_64/root/builddir/build/BUILD/pulseaudio-14.0
Assign this directory to the environment variable PULSE_DIR. On your system, this value may well be different:
PULSE_DIR=/var/lib/mock/epel-8-x86_64/root/builddir/build/BUILD/pulseaudio-14.0
Build the xrdp module
Finally, let’s build xrdp source / sink modules. You’ll have two .so files module-xrdp-sink.so and module-xrdp-source.so.
make libtool libtool-ltdl-devel pulseaudio-libs-devel git
git clone https://github.com/neutrinolabs/pulseaudio-module-xrdp.git
cd pulseaudio-module-xrdp
./bootstrap && ./configure PULSE_DIR=$PULSE_DIR
make
Install the xrdp module
The last step to install xrdp module is to install module files at the right location. In the same pulseaudio-module-xrdp directory from the previous step:
sudo make install
To load xrdp module, you need to add instructions in Pulseaudio configuration file. The following command line will append new instructions at the end of the configuration file.
sudo tee -a /etc/pulse/default.pa << END
### XRDP modules
.ifexists module-xrdp-sink.so
load-module module-xrdp-sink.so
.endif
.ifexists module-xrdp-source.so
load-module module-xrdp-source.so
.endif
END
Due to a Pulseaudio issue and in order to have the right configuration, you need to mask pulseaudio service. Pulseaudo will be started at session startup anyway.
The following command line needs to be executed as user.
systemctl --user mask pulseaudio.service
To apply the new configuration, you can restart the VM or run the following command:
pulseaudio -k
Cleaning up
You can clean up the build machine completely if required:
- Use
mock --cleanto remove themockchroot - Delete the xrdp-tmp directory
- Remove the user from the
mockgroup.sudo gpasswd -d $USER mock - Remove the
mockRPM.sudo dnf remove -y mock
Sources
Official sources / documentation
Official Centos 8 build documentation
Reset Enhanced Session Mode Settings
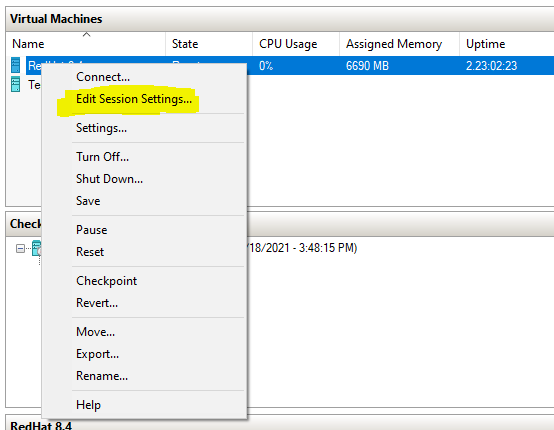
If you want to change Session settings and dedicated windows are not prompted at startup, you can right-click on VM and select Edit Session Settings.